| INDEX | 1300-1599 | 1600s | 1700s | 1800s | 1900s | CROSS-ERA | ETHNO | |
| MISCELLANY | CONTACT | SEARCH | |
|
|
Background info on paniers and when which shape was en vogue. BTW, "pannier" is a misspelling.
Before you begin, consider what shape of panier you need. There are two dimensions to think about: the vertical one, or silhouette, and the horizontal one, i.e. the shape of the skirt if seen from above. Here's a rough overview of how the horizontal shape changed over time:

The relative dimensions of the drawings are not accidental,
but not exact either. The vertical shape is more difficult.
Generally, the 20s and 30s tend to be more dome-shaped, the
40s more boxy or oblong (but there were still dome-shaped skirts),
the 50s and 60s dome-shaped but with less flare than the 30s,
the 70s relatively straight. However, the boxy shape persisted
for formal use until well into the 1770s.
Tape for a waistband (waist width + allowance for a bowtie),
tape for the tunnels for the steels (depends on panier shape
- about 20m for a big one) , non-stretching fabric (linen, canvas,
an old bed sheet), amount depending on which pattern you use.
Boning: For pocket hoops, good plastic boning (NOT rigilene)
works fine. For larger and wide paniers, petticoat (aka crinoline)
steel is necessary. 1x12 mm (measurements including the plastic
covering) worked fine for my 1740s panier, which is about as
large as you can get. The amount again depends on the panier
shape. Best to make a paper pattern, then take the measure off
the tunnels.
The small pocket hoops or considérations are suitable for the period 1750-75. One pattern piece is one panier (=basket), so cut it twice.
The big paniers are suitable for 1730s-50s, and later formal dress. There are box-shaped as well as flaring and kidney-shaped versions - the pattern is for short box-shaped half-paniers like the 1770s exhibit at the V&A (strong lines), and for a long kidney-shaped flared one (broken lines - prolong as far as you need it, i.e. to two hands above skirt lentgh). Cut each pattern piece four times, or rather the big ones twice to fold.
Variations:
To get a boxier shape, gather the top part more. If you want
an oblong silhouette, cut the side more vertical, i.e. wider
at the top and narrower at the bottom.
For a softer, dome-shaped silhouette, cut the diagonal top hoop
shorter than the tunnel and gather the tunnel slightly. You
may also want to make the side more vertical by cutting a triangular
piece away, i.e. same width at top but less ath the bottom.
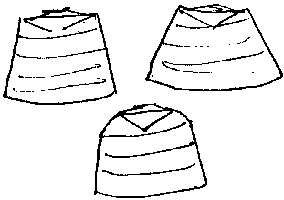
Here's a quick sketch of how theres changes influence the skirt shape:
 Upper left, a more boxy version with almost vertical sides.
Upper right, very flared - as in the pattern - but with a closely gathered top so that the skirt will stand out horizontally from the waist.
Below, shortened top hoop with gathered tunnel for a more dome-shaped silhouette.
My "Allemande"
hoop skirt is made that way.
Turn edge along the pocket slit. Sew on tapes along the lines marked "tunnel". Close the C-B seam, sew in the bottom part starting with the straight D-B seam. Pin E to E and sew the rounded seam. Pleat top edge and mount both paniers onto a waistband that will be hooked or tied closed. Cut boning to lengths of about 58, 53, and 48 cm. The longest one goes into the bottom tunnel, the shortest into the top one. Gather the surplus fabric along the bone. If you use plastic whalebone, you can heat a thick needle over a candle flame and melt a hole through the bone and fabric, then sew through the hole - otherwise the fabric will just slip off the bone. Or you run along the tunnel with bating stitches and pull on the thread until it's gathered to the desired length. The pocket hoops can, as the name implies, serve as pockets reached through the slits on top. But you may prefer to wear separate pockets inside the hoops as it can look pretty awkward if you reach all the way down the hoops to grope for something.
Connect all the pieces (attach the A-B edge of the small top part to the top edge of the big part), leaving one vertical seam open. Flatten seams by stitching them down. Sew on tape where it says "tunnel". From point A up is the centre front and centre back, respectively. The centre back is about 1.5 cm wider (or higher? ...the vertical CB seam is longer) than in front . (The pattern shows the front parts.) The C-A' line is gathered and attached to a waistband. Close the vertical seam you'd left open and insert bones into tunnels.
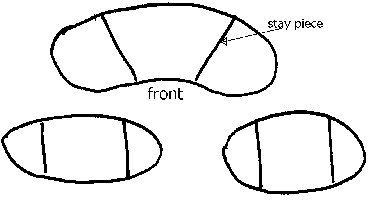
The cross-section shape (seen from above, that is) of a long panier as was worn during the 1730s to early 50s depends on ribbons or bands of fabric sewn across the inside. Cut two pieces of fabric as wide as the tunnels are apart and about 35 cm long and fix them vertically between the lower (3rd and 4th) bones some distance from either side of the middle. If these stay pieces meet both back and front of the panier at the same distance from the CB and CF, the shape will be oval. If the distance from the CB is longer than from the CF, you'll get a kidney shape. Here's a sketch of how the stay pieces influence the shape:

Note how longer stay pieces, set further apart, result in a more rounded oval shape than shorter ones set closer together. If the stay pieces are set in diagonally, closer together in front, the result will be a kidney shape (above).
Experiment with the length and position of the stay pieces until you're satisfied with the shape.
The seams of the panier should be well above the feet (it would look and feel awkward if you kicked the bottom steel with every step) and get a box- or knife-pleated flounce to prevent the skirt from moving inwards under the last bone.
Content, layout and images of this page
and any sub-page of the domains marquise.de, contouche.de,
lumieres.de, manteau.de and costumebase.org are copyright (c) 1997-2022 by Alexa Bender. All rights
reserved. See Copyright Page.

GDPO


This work is licensed under a Creative Commons License.